Wow. The weather sure has changed here since last weekend, and we have been experiencing weather in the 80s with loads of SUNSHINE. Which means this preggo mama is H.O.T in this old house....I really need some new dresses and skirts, but the key word is preggo. Im unwilling to buy maternity clothes because 1: This will most likely be our last baby. 2: Theyre expensive and 3: I dont like to buy things I cant wear for awhile. Not to mention, its difficult to find maternity clothes I like enough to spend money on.
Then there is the regular clothes that can be worn during pregnancy....but I have to have the fundage to buy said clothes. With a new baby, a NEED for a new car, and 3 children going to school this year, money wont be there to buy myself some new clothes. Dont get me wrong, Ill most likely slip a store bought dress or two in there somewhere, but I like variety. (I dont tell myself this on laundry day, when I think we could all do with a little less clothing.)
And while I adore dresses, I love jeans too. Whats a girl to do when jeans are over $30 a pair and her waist is expanding? Some would cave and buy a couple pairs of maternity jeans, or forgo jeans altogether...but not me. I have contemplated buying the ingenious belly band, but its $15! I could buy a dress or skirt with that! Or, a few yards of really cute material to make my own dresses and skirts, AND belly bands. And thats exactly what Ive done.
Ive refashioned a t-shirt into the top of a dress (my first EVER!), and made 2 belly bands (maybe I should call them something else?) so far. I spent about 2 hours tuesday night measuring and cutting and sewing (with the original plan to make a couple of skirts!) the t-shirt dress, 2 hours finishing it on wednesday, and made the bands yesterday. Today, I must do housework and laundry....I must, I must, I must.
Even though I want to keep on sewing things....
So after a couple hours of housework, Ill post the tutorials and pics of what Ive done. Keep your eyes open for them!
Friday, May 6, 2011
Tuesday, May 3, 2011
tickle me tuesday
Its Tuesday! Time to share what tickles me this week...but first....an announcement!
Were having another girl!!
I knew this already. My husband was holding out hope still, and still is since her legs were tight together, but the tech and I both saw a girl. We both really wanted a boy (and I do mourn that I wont have a "mamas boy"), but this is a good thing. I no longer have to give up my craft room since 2 girls will share a room, I dont have to fight with hubby about the decor (hes a mish mash sort of person and wasnt exactly leaning towards baby type decor, more what he would do now as an adult, not, you know, newborn), and I get to play with girly baby stuff some more.
But lets face it, girls are more expensive, and were not monetarily rich, nor do we own a 4,000 sq ft, 5 bedroom house. So Im totally tickled by these ideas and inspiration for everything girl, on the cheap, that can be shared.
With our oldest two sharing a room soon, we need two beds to fit in a small space, and I love these beds because of the storage and the simplicity. My husband can easily make them and they should be fairly inexpensive to make, which is L.O.V.E right now for us.
 Our girls have picked a red, pink and blue theme (how convenient since the two youngers will be those too!) similar to this room:

And whats especially great, is the walls are already a pale blue. All I have to paint is the trim and furniture white, and pick out/make new bedding. Which will be where the bulk of the cost will be, but I plan on making the bedding myself this time. Will be much cheaper that way! I plan on using store bought sheets and some stamps, trim, etc, for just about everything.
How cool would it be if we did something like this for each girl to have her own space on each side of the bed? (without the pole, but adding cork board or something like that, above the desk):

But with these for shelves too, as well as in the bed storage (can you say hello dollar store?!)cheap!! :

I would make some of these for each "desk" unit to hold pens, pencils and such in different sizes and colors and patterns:
 And I would love, love LOVE if I could find some of these for on top or underneath of the dresser/vanity for storage:
 Im hoping to get started by summer and finished by fall, and hope to do both rooms, or at least partial of the youngers', at the same time. The bed building will be the most time consuming and expensive, but hopefully hubby can knock them out pretty easily and quickly. We have lots of wood laying around, so maybe well be able to save there.
Were having another girl!!
I knew this already. My husband was holding out hope still, and still is since her legs were tight together, but the tech and I both saw a girl. We both really wanted a boy (and I do mourn that I wont have a "mamas boy"), but this is a good thing. I no longer have to give up my craft room since 2 girls will share a room, I dont have to fight with hubby about the decor (hes a mish mash sort of person and wasnt exactly leaning towards baby type decor, more what he would do now as an adult, not, you know, newborn), and I get to play with girly baby stuff some more.
But lets face it, girls are more expensive, and were not monetarily rich, nor do we own a 4,000 sq ft, 5 bedroom house. So Im totally tickled by these ideas and inspiration for everything girl, on the cheap, that can be shared.
With our oldest two sharing a room soon, we need two beds to fit in a small space, and I love these beds because of the storage and the simplicity. My husband can easily make them and they should be fairly inexpensive to make, which is L.O.V.E right now for us.


And whats especially great, is the walls are already a pale blue. All I have to paint is the trim and furniture white, and pick out/make new bedding. Which will be where the bulk of the cost will be, but I plan on making the bedding myself this time. Will be much cheaper that way! I plan on using store bought sheets and some stamps, trim, etc, for just about everything.
How cool would it be if we did something like this for each girl to have her own space on each side of the bed? (without the pole, but adding cork board or something like that, above the desk):

But with these for shelves too, as well as in the bed storage (can you say hello dollar store?!)cheap!! :

I would make some of these for each "desk" unit to hold pens, pencils and such in different sizes and colors and patterns:

Sunday, May 1, 2011
Super simple coffee filter candle holder (tutorial)
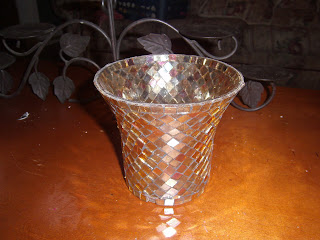
With the addition of our new shelf (see the post here) I needed a couple of small things to fill it, and came across a pretty coffee filter craft, where it looks like a huge flower for a lamp shade. I thought to myself it would make a gorgeous vase or candle holder, so I got out my glue gun and the coffee filters, and turned a beautiful candle holder that was part of a 3 set (not anymore, thanks kids!) into something even prettier and more fitting for our home. Its a very simple project, but pretty time consuming. And possibly painful if youre anything like me...it really hurts to burn your finger with hot glue, and then peel off a couple layers of skin at the same time. So be careful if you attempt this craft. I have NOT quite finished it (ran out of filters), but promised a tutorial so here it is.
What I started with. Pretty huh? Especially pretty with a candle or in the sunlight for fall. But I want a different look I can use all year round.

Lets get started. If youre going to use glass, clean it first so the glue has a nice clean surface to adhere to.
Fold your filter in half:
 In half again:
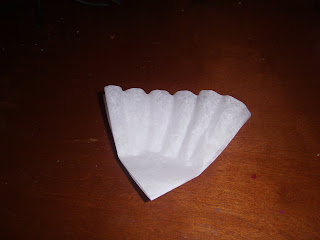 Fold into thirds:
 Then fold in half again from the bottom up:
 Start gluing!! Keep the flowers close together, with the pointy part pointing down. Sometimes you may need to twist or turn the flower to fit it and get it even with the rest. Then, fluff up a little bit. Easy peasy!


 I promise to post the completely done piece once it IS done, and on the shelf in all its glory.
What I started with. Pretty huh? Especially pretty with a candle or in the sunlight for fall. But I want a different look I can use all year round.


Lets get started. If youre going to use glass, clean it first so the glue has a nice clean surface to adhere to.
Fold your filter in half:


TADA!! Pretty huh?!

Subscribe to:
Comments (Atom)